Turn a pencil sketch into clean, editable SVG line art for a methods figure — how to shoot it, what the tracer actually does, and how to fix the usual mess.
SciFig Team
SciFig editorial team
Vectorizing turns a photo of a hand-drawn sketch into editable SVG paths.
Most scientific figures start life on paper. Someone sketches the reaction, the rig or the workflow on a notepad during a group meeting, everyone agrees that is the right diagram, and then it sits in a photo on someone's phone until the deadline. The redrawing step is where it dies.
You do not have to redraw it. A tracer can turn that photograph into vector paths you can label and publish — but only if you give it something it can read, and only if you know which parts of the result to clean up.
What you actually get when you vectorize a sketch to SVG
Vectorizing converts a photo of your sketch into outlines instead of pixels, which is what a scientific figure needs in order to survive a journal’s resizing. Every stroke becomes a path with coordinates, so it stays sharp at any size and every shape can be selected, recolored and moved.
What it does not do is understand your chemistry. The tracer sees dark marks on light paper, not a reaction mechanism. That distinction predicts almost everything about the result: pencil strokes come through cleanly, and so do the coffee ring, the ruled lines of the notepad and the shadow of your hand.
The practical consequence is that the quality of your source photo matters more than the tracer settings. Ten seconds spent on lighting saves ten minutes of deleting stray shapes.
See Sketch-to-Figure in Action
From napkin sketch to Nature-quality scientific figure — powered by SciFig AI.
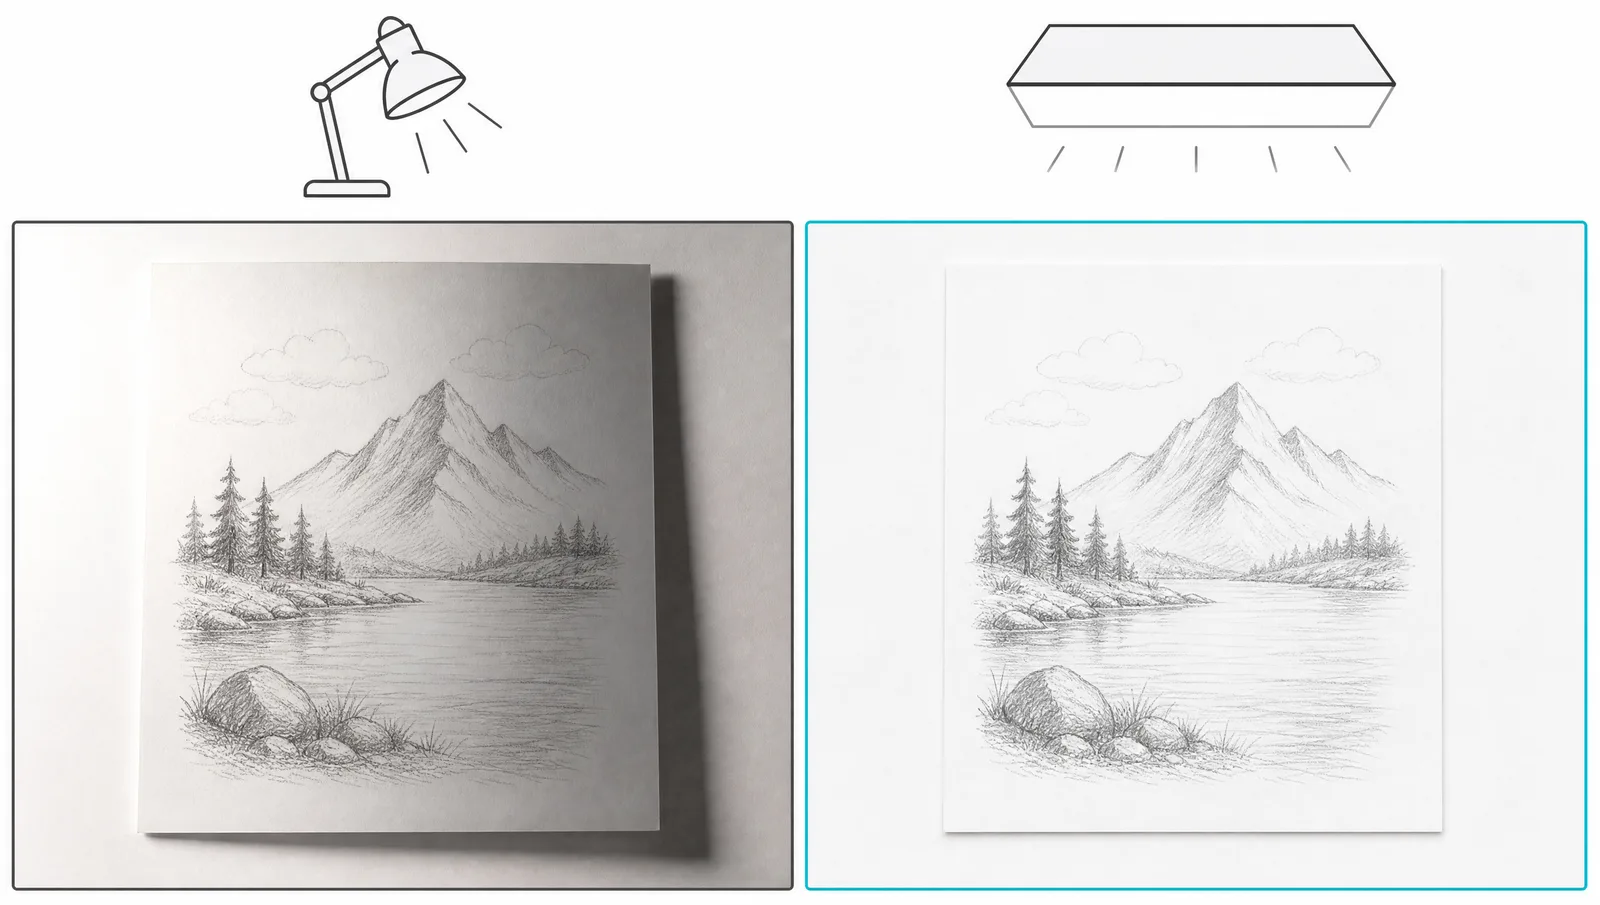
Side-by-side comparison of a paper sketch lit unevenly by a desk lamp and the same sheet under even diffuse light (Figure generated with SciFig)
If the sketch only exists in your head so far, SciFig AI Illustration (AI scientific illustration) sketch to figure can turn a rough outline into a clean, editable figure — but if you already have paper, start here.
Put the sketch on plain, unlined paper if you can. If it is already on a ruled notepad, expect the rules to be traced as horizontal lines you will delete afterwards.
Light it evenly. A sketch shot under a desk lamp has a bright side and a dim side, and the tracer reads that gradient as a shape boundary. Diffuse daylight or an overhead scan gives a flat field, and flat fields trace cleanly.
Shoot straight on, not at an angle. Perspective skew is not corrected during tracing — a trapezoid on paper stays a trapezoid in the SVG.
Source
Typical result
Flatbed scan, 300 dpi+
Cleanest paths, minimal cleanup
Phone photo, diffuse daylight
Good; occasional speckle from paper grain
Phone photo, desk lamp
Shadow edges traced as false shapes
Photo of a whiteboard
Glare spots become filled blobs
Screenshot of a photo
Compression artifacts traced as noise
Step 2: Raise the contrast before you upload
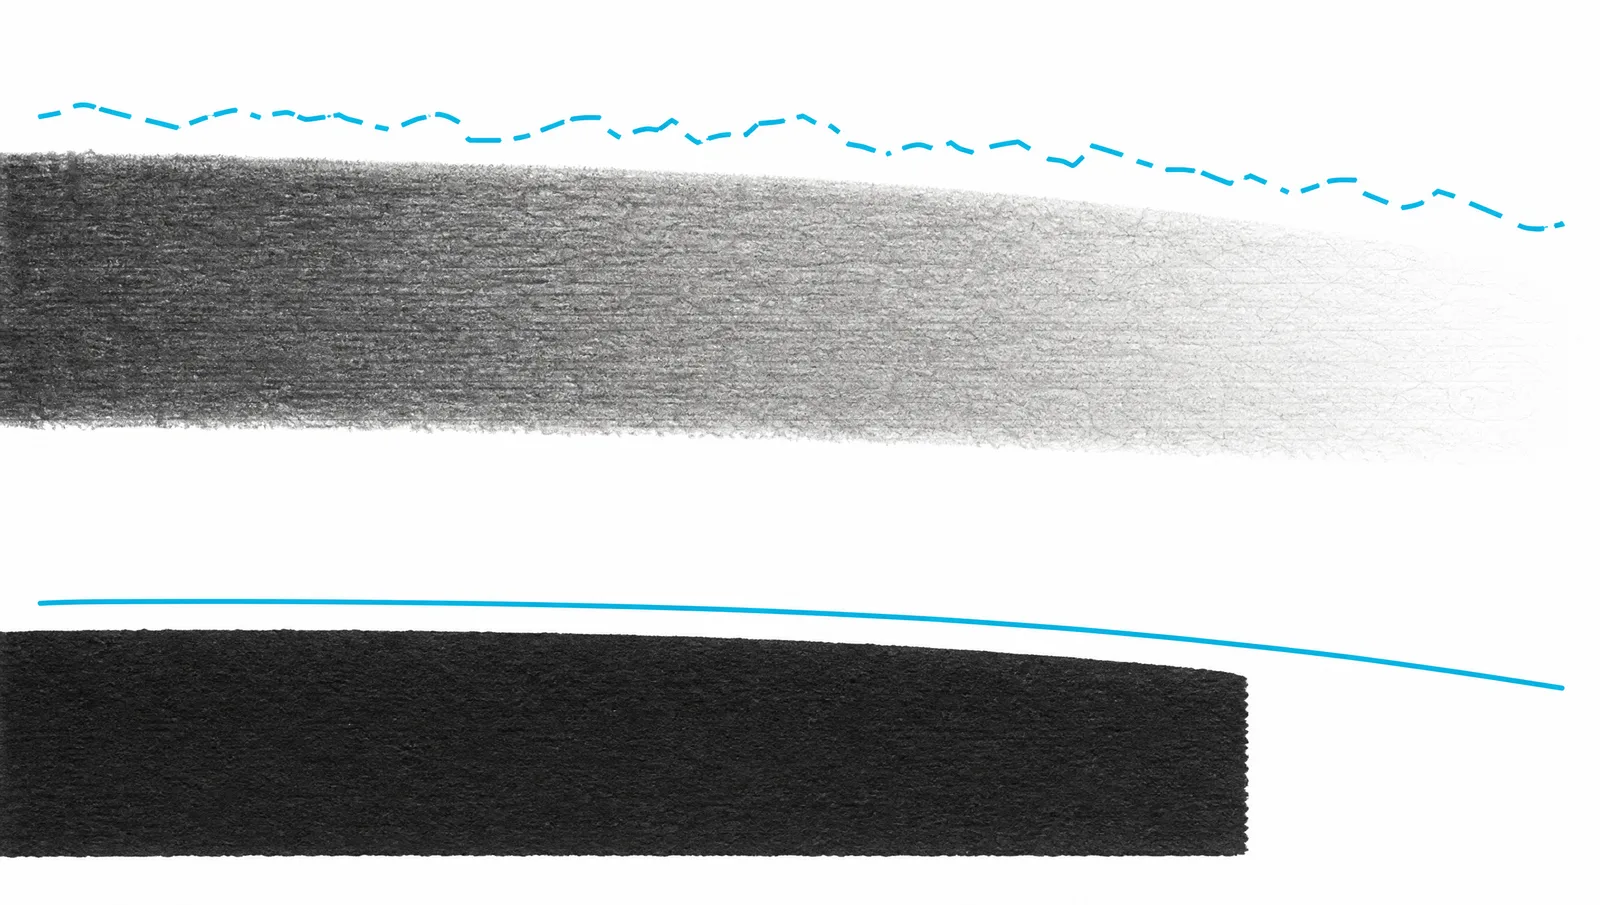
Magnified pencil stroke with a soft edge producing a broken traced outline, next to an ink stroke with a sharp edge producing one continuous outline (Figure generated with SciFig)
If the pencil is light, darken it. Almost any photo app has a contrast slider; pushing it until the strokes are near-black on near-white paper is the single highest-leverage thing you can do.
The reason is mechanical. A tracer places a path where it detects an edge, and an edge is a contrast step. Faint graphite on cream paper produces a weak step, and weak steps produce broken, wobbly paths. Strong ink-to-paper contrast produces continuous paths.
Tip
If your sketch is in pencil, go over the final version in fineliner before photographing it. It takes two minutes and removes most of the cleanup work later.
Step 3: Convert the image to an editable SVG
Upload the photo to a converter that returns editable geometry rather than an embedded bitmap. Some tools produce an SVG file that merely wraps your JPEG in a <image> tag — the extension changes, nothing else does. Check that you can select an individual stroke afterwards.
SciFig's image to SVG converter traces the upload on our servers and runs OCR over it, so any lettering you wrote by hand comes back as text objects you can retype rather than as frozen shapes. The result opens directly in Vector Canvas.
Two things worth knowing about how this works: the vectorization happens on our servers rather than in your browser, and the content needed to fulfil the request is sent to the model provider through a commercial API. We do not authorise any provider to train on your content, and we never train AI models on your uploads or output on any plan. An uploaded image can be deleted at any time, and deletion removes the stored object from our storage rather than hiding it from your view.
Refine Figures in the Vector Canvas
Open any AI-generated figure in the editable canvas — layered SVG, 8K PNG, or editable PPTX.
Step 4: Clean up the three things that always go wrong
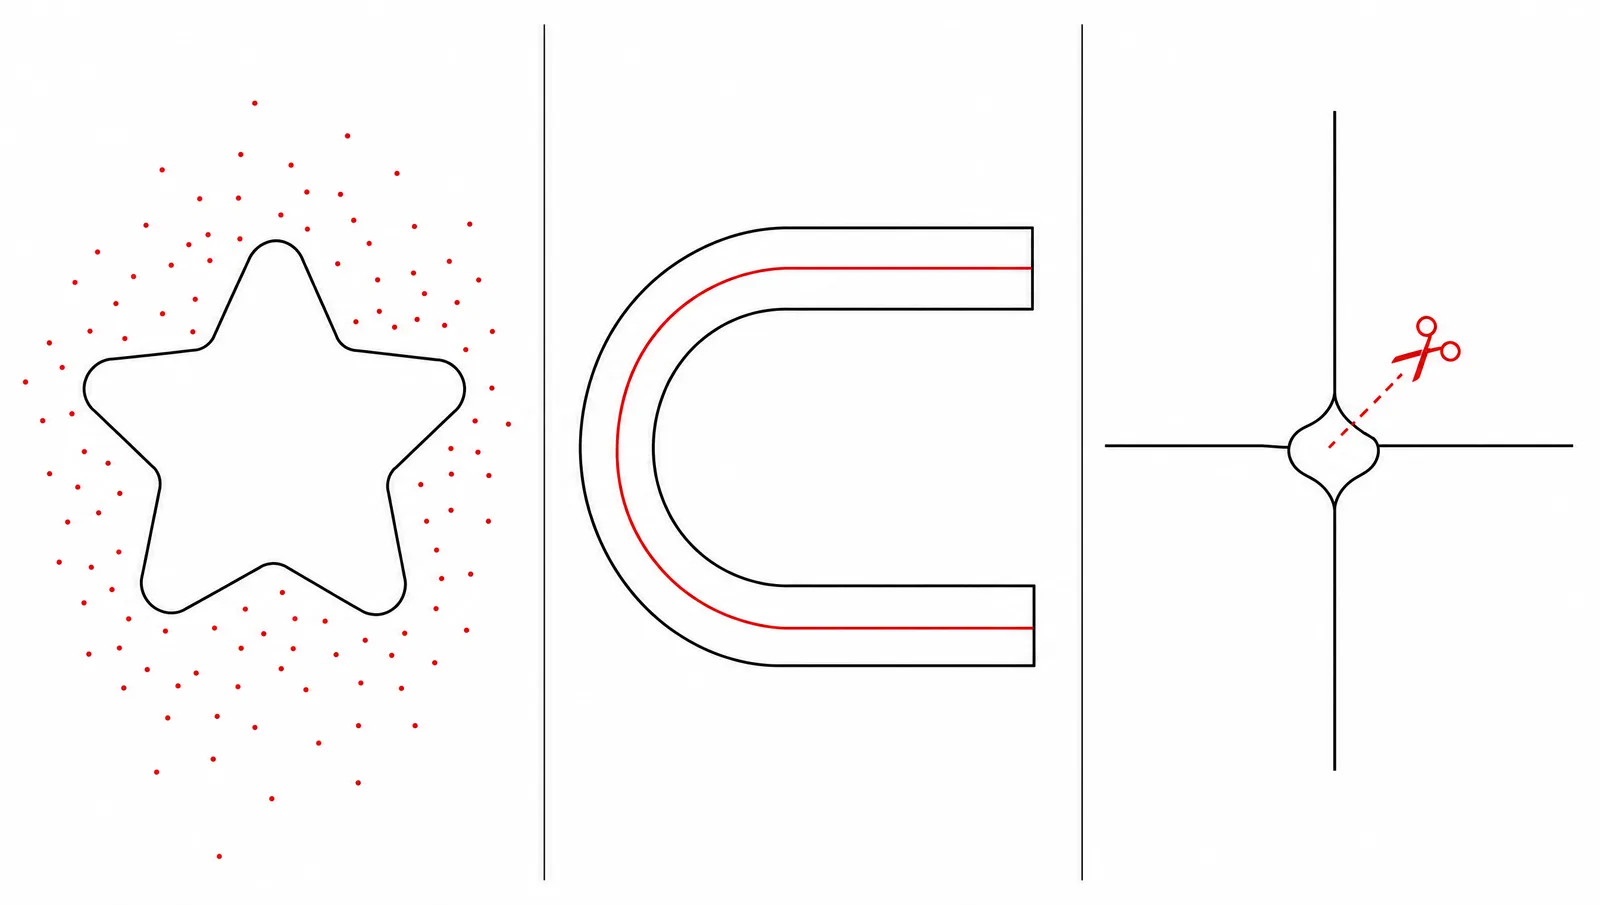
Three panels showing the recurring defects in a traced sketch: scattered specks, doubled outlines and a welded junction (Figure generated with SciFig)
All three are fixed in Vector Canvas, which is where the converted file lands. Every traced sketch has the same three problems. Fixing them takes about five minutes once you know what to look for.
Stray specks. Paper grain and compression noise become dozens of tiny closed paths. Select one, then use the editor's select-similar or size filter to catch the rest and delete them in one action.
Doubled outlines. A thick marker stroke has two edges, so the tracer may return the stroke as an outline rather than a single line. If you want a true single-stroke look, delete the inner path and give the outer one a stroke instead of a fill.
Merged junctions. Where two lines cross, the tracer often welds them into one shape. If you need them separate — for example an arrow that must move independently — cut the path at the junction and rejoin the halves.
Step 5: Relabel, recolor and export for the journal
Now the figure behaves like a real drawing. Retype the labels OCR recovered so the spelling and font match the rest of your figures. Swap the palette for a color-blind-safe one if the sketch used red and green to distinguish anything.
Before you export, you can use 5 common figure mistakes as a quick reference. Then export at whatever your target journal asks for. Vector output prints at press resolution, which is why most journals accept it and several prefer it.
FAQ
Yes, but raise the contrast first. Graphite on white paper gives a weak edge signal, which produces broken and wobbly paths. Darkening the image — or tracing the final version in fineliner before photographing — gives continuous, clean outlines.
Those are paper grain, compression artifacts and shadow edges being read as real marks. Re-shoot under even light or raise the contrast, and most of them disappear. Whatever survives can be removed in one pass with a size filter.
Yes, when OCR can read it: SciFig's image to SVG converter returns legible handwriting as editable text objects, and print works far better than cursive. Anything unreadable is preserved as vector shapes instead of being dropped, so nothing disappears from the figure.
A flatbed scan at 300 dpi or above is the cleanest source because it is evenly lit and geometrically flat. A phone photo in diffuse daylight is close behind. The gap only becomes obvious with faint pencil or a large sheet.
You can, but expect more cleanup. Glare spots become filled blobs and marker strokes are usually thick enough to trace as doubled outlines. Photograph slightly off-axis to avoid the reflection, then correct the skew before uploading.
Keep going
Recommended resources
Templates, tools, and further reading for your research